CyberStore Ecommerce 2023 Documentation
Site Configuration
The first tab in the "Site Manager" is the Site Configuration tab.
This tab allows you to set Site-level preferences. You can access the various options through the sub tabs on the left side of the screen. These include:
Website Path Logging Email SMS Database Site Scripts Integrations Maintenance Mode
Use the Website tab to control the key settings required to operate your website.
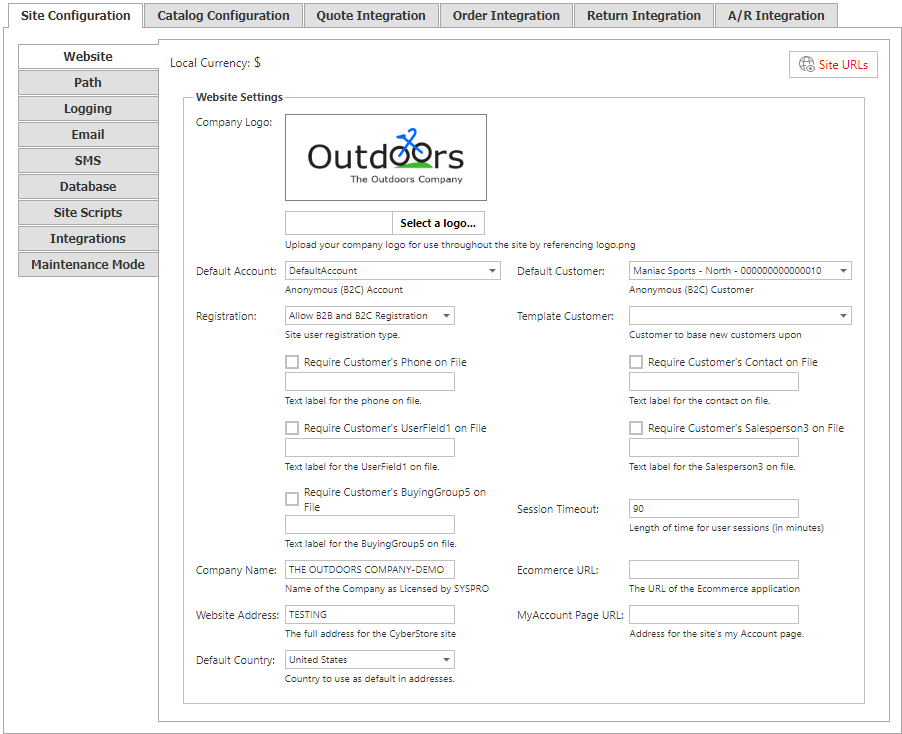
The Websitetab contains the following settings:
| Website Information | |
|---|---|
| Local Currency | The default currency as established in SYSPRO. |
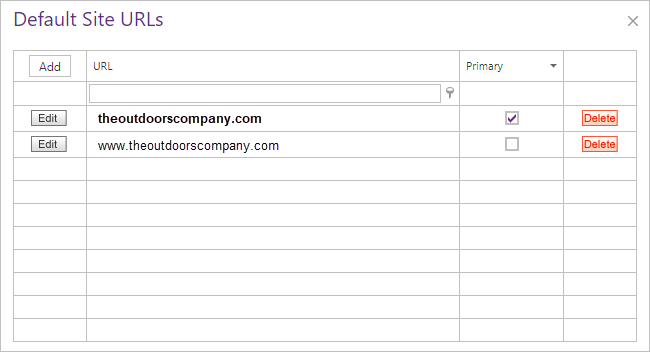
| Site URLs |
The Site URLs button will appear can be found at the top right of the screen and it is used to configure various site names addresses.
|
| Company Logo |
Upload a copy of your company logo and it will be saved to the server, and then used throughout the site's theme wherever logo.png is referenced. To upload, click the Select a logo... button and then browse your file system to find the image file, or simply drag and drop the image from your system onto the logo box on the screen. |
| Default Account | The Account that users run under before they log in, otherwise called the Anonymous User. This Account uses the "Default Customer." An Account set as the Default Account cannot be deleted from CyberStore. |
| Default Customer | The SYSPRO Customer used for all B2C Accounts. Pricing for B2C Accounts is based on this user's settings in SYSPRO. Pricing yielded by the Default Customer is also used as the Default Price (often referred to as "List Price") for Customers with different pricing. Visibility of Items is based on the View List for the Customer Class linked to the Default Customer. |
| Registration |
The section that determines how users are able to register for an Account.
All fields except for the Customer Number are optional. |
| Template Customer | The SYSPRO Customer used as a template when creating new Customers in SYSPRO. This customer's settings are cloned to establish the general properties of the new Customer record. |
| Session Timeout |
The number of minutes of inactivity that may pass before a CyberStore visitor's web session expires. When a session expires, the user is logged out and any Items in their Shopping Cart are cleared.
Closing a browser automatically terminates a session even if it occurs before the Session Timeout.
|
| Company Name | The name of the Company in SYSPRO. This value must match the name of the Company in your CyberStore license. |
| Ecommerce URL | The website URL for the CyberStore's e-commerce application (e.g., http://www.yourDomain.com/ecommerce). |
| Website Address | The full Domain address of your CyberStore website (e.g., http://www.yourDomain.com). |
| MyAccount URL | The full web address of your CyberStore's "My Account" page (e.g., /ecommerce/CustomerMyAccount.aspx). |
| Default Country | The default Country to be assumed for the Site. |
Important Note:
Changes made in the Site Manager take effect immediately and are saved as soon as you leave a field, check a box, or make a drop-down selection.
The change confirmation mark  appears next to the field you are editing and disappears upon saving.
Use the Path tab to set key system folder locations and names for the Site.
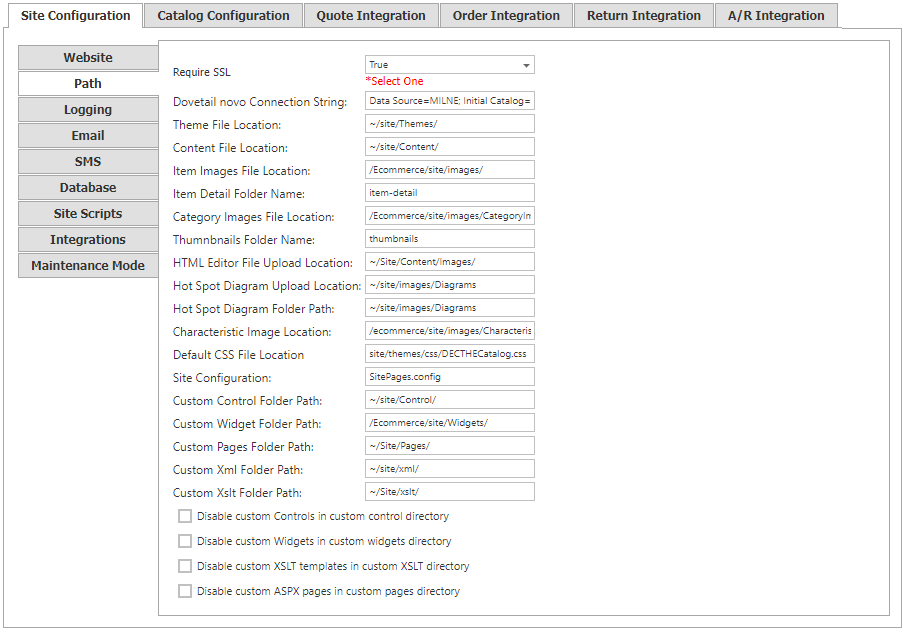
The Pathtab contains the following settings:
| Path Information | |
|---|---|
| Require SSL |
This option controls whether the entire CyberStore Site will default to SSL encrypted connections via HTTPS. To enable this, set the value to "true." If set to "false," registration and checkout pages will still utilize HTTPS, but catalog and content pages will default to non-encrypted HTTP connections. |
| Theme File Location | The path to where your Site's theme file is saved. |
| Content File Location | The path to where your Site's content file is saved. |
| Item Images File Location | The path to where your Site's Item images folder is saved. |
| Item Detail Folder Name | The name of the folder in which your Item Details are stored. |
| Category Images Folder Location | The path to where your Category images folder is saved. |
| Thumbnails Folder Name | The name of the folder in which your Site's thumbnails are stored. |
| HTML Editor File Upload Location | The path to where your HTML Editor file is saved. |
| Hot Spot Diagram Upload Location | The path to where your Hot Spot Diagrams are saved. |
| Hot Spot Diagram Folder Path | The path to where your your Site's Hot Spot Diagram folder is saved. |
| Characteristic Image Location | The path to where your Characteristic images are saved. |
| Default CSS File Location | The path to where your Site's CSS files are automatically saved. |
| Site Configuration | The filename of your Site's configuration file (typically SitePages.config). |
| Custom Control Folder Path | The path to your Site's custom Control folder. |
| Custom Widget Folder Path | The path to your Site's custom Widgets folder. |
| Custom Pages Folder Path | The path to your Site's custom Pages folder. |
| Custom Xml Folder Path | The path to your Site's custom xml folder. |
| Custom Xslt Folder Path | The path to your Site's custom xslt folder. |
| Disable Custom Controls |
Turns off any custom controls and forces the system to revert to default controls. Warning: It is not recommended that this feature be enabled in production environments. |
| Disable Custom Widgets |
Turns off any custom widgets and forces the system to revert to default widgets. Warning: It is not recommended that this feature be enabled in production environments. |
| Disable Custom XSLT Templates |
Turns off any custom XSLT transformation files and forces the system to revert to default XSLT files. Warning: It is not recommended that this feature be enabled in production environments. |
| Disable Custom ASPX Pages |
Turns off any custom ASPX pages and forces the system to revert to default pages. Warning: It is not recommended that this feature be enabled in production environments. |
Important Note:
Changes made in the Site Manager take effect immediately and are saved as soon as you leave a field, check a box, or make a drop-down selection.
The change confirmation mark appears next to the field you are editing and disappears upon saving.
Use the Logging tab to set the Site's log location and advanced troubleshooting features.
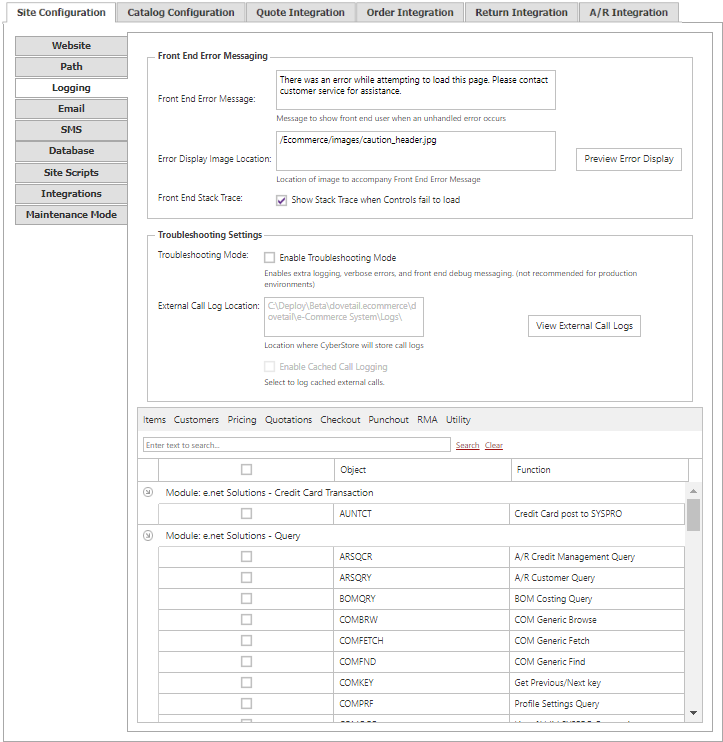
The Logging tab contains the following options:
| Logging Information | |
|---|---|
| Front End-Error Message | When you enter text in this section, it is displayed as the front-end Site error message if an uncaught exception occurs. This text appears whether or not you select the "Enable Front End Stack Trace" option. |
| Error Display Image Location |
The URL for an image that can be included in the Front End Error message. Click the Preview Error Display button to see how an error message with text and image will appear on the front-end of the Site. |
| Front-End Stack Trace |
This section contains detailed technical information about any uncaught exception in the CyberStore application. By default, this information does not appear, but you can use this option to enable its appearance. Warning: It is not recommended that this feature be enabled in production environments. |
| Enable Troubleshooting Mode |
Turns on troubleshooting services such as external call logging, verbose errors and front-end debug messaging. This option must be enabled to write any external call logs. Warning: It is not recommended that this feature be enabled in production environments. |
| External Call Log Location | The physical location of the file system folder to where log files are saved when enabled for the Site. |
| External Call Log Mode | Allows for the ability to log all external calls including those that are cached in memory. |
| External Call Debugging Logs |
You may choose which functional areas you would like to log. Select which external calls to be logged. Select/Deselect All by toggling the top checkbox. The calls are grouped by module and have a short description of their function. The toolbar buttons allow selection by CyberStore components. i.e Items, Customers, Pricing, Quotations, Punchout, Checkout, RMA and Utility. And the search box in the grid allows you to type characters of an object name or description and filter the list down to ease finding the desired objects to log. As a security measure, payment transaction requests and responses omit personal credit card numbers from the files generated. Troubleshooting Mode must be enabled for any logging to write to the log directory, even when functional areas are selected. Warning: It is not recommended that this feature be enabled in production environments. |
Important Note:
Changes made in the Site Manager take effect immediately and are saved as soon as you leave a field, check a box, or make a drop-down selection.
The change confirmation mark appears next to the field you are editing and disappears upon saving.
Use the Email tab to manage CyberStore application's email server and general function settings. You can specify the connection information required by the SMTP server that will be used to send email from the CyberStore application. You can also specify global settings for CyberStore emails.
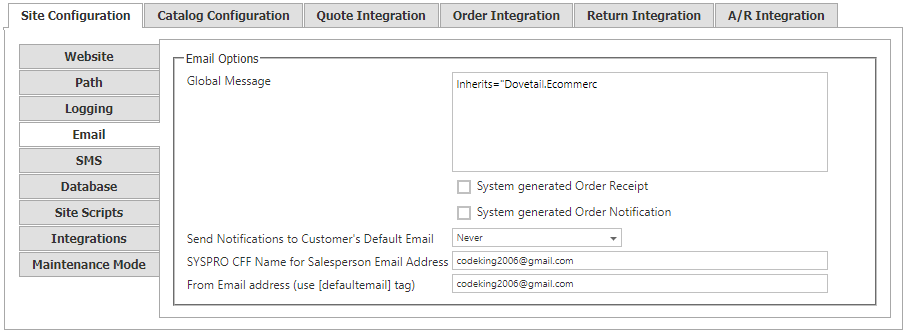
The Email tab contains the following settings:
| Email Information | |
|---|---|
| Email Options |
"Global Message": "System Generated Order Receipt": "System Generated Order Notification": "Send Notifications to Customer's Default Email": "SYSPRO CFF Name for Salesperson Email Address": |
Where did Email Server settings go?
Beginning with the 2023 release, email server settings preiously found here have been migrated to Tools > Application Settings screen in the Communications Settings tab as they are application wide settings and not adjustable by Site.
Important Note:
Changes made in the Site Manager take effect immediately and are saved as soon as you leave a field, check a box, or make a drop-down selection.
The change confirmation mark appears next to the field you are editing and disappears upon saving.
Use the SMS tab to view and configure information about SMS Text capabilities provided thorugh integration with the TeleSign SMS provider.
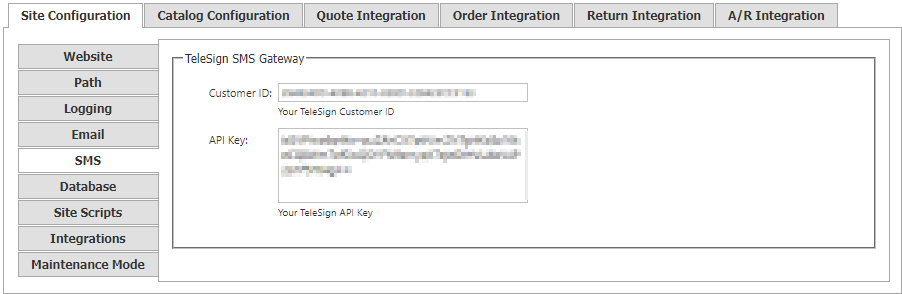
The SMS tag contains the following section:
| TeleSign SMS Gateway | |
|---|---|
| Customer ID | The Customer ID for your TeleSign account. Requires additional subscription and incurs additional third-party fees. See www.TeleSign.com for more information |
| API Key | The API Key for your TeleSign account integration. |
Important Note:
Changes made in the Site Manager take effect immediately and are saved as soon as you leave a field, check a box, or make a drop-down selection.
The change confirmation mark appears next to the field you are editing and disappears upon saving.
Use the Database tab to view information about the Microsoft SQL Server information for the CyberStore application. The database connection cannot be changed using the Site Configuration Manager.
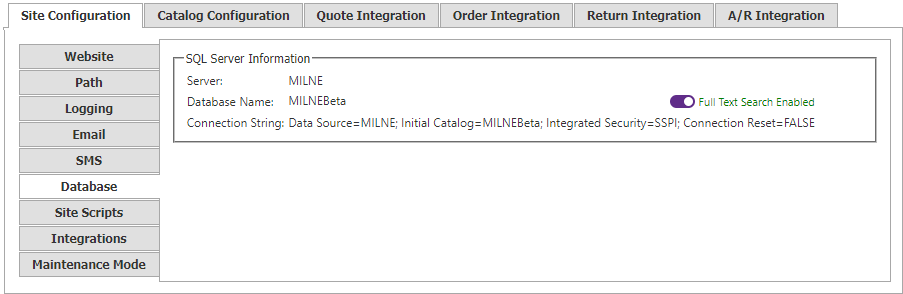
The Databasetab contains the following sections:
| Database Information | |
|---|---|
| Server | The name of the website's SQL Server. This must be a valid name of a machine on the network, or '(local)', if the website and SQL server are on the same computer (not recommended for production environments). |
| Database Name | The name of the database. |
| Full Text Search Indicator |
To the right of the database name, a visual icon and message indicates whether the installed SQL Server instance supports Full Text Catalog Searching. When enabled, the Full Text and "Fuzzy" Search options are available for use. See the Website tab above for more information. |
| Connection String | The data source connection string used by the application to access the database. |
Use the Site Script tab to manage Google Analytics tracking. CyberStore can automatically render web pages compatible with the popular Google Analytics platform, and you can include appropriate Google Analytics scripts within the pages of the Site.
Also, use this tab to inject specific HTML, JavaScript or Style code into the <HEAD> section of every page in the Site.
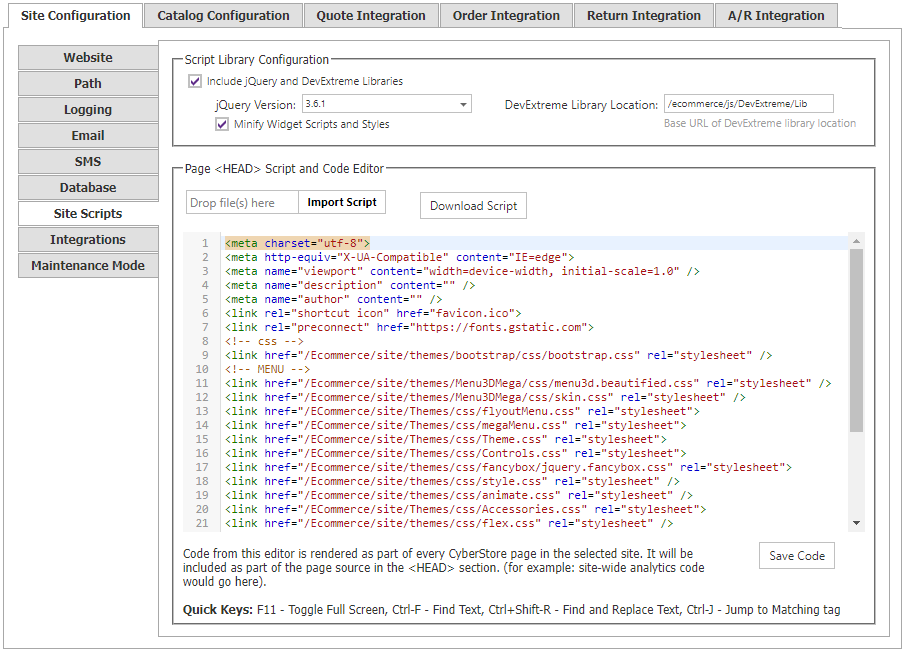
| Site Scripts Information | |
|---|---|
| Script Library Configuration |
Enable the use of jQuery and DevExtreme libraries. (Recommended)
|
| Page <HEAD> Script and Code Editor |
Section in which you can insert any custom scripts, tags, or styles that will appear on every page of your Site. When code is saved a file called sitescript.txt is saved to the Site folder which contains the code for archival and mobility. Whenever the editor is loaded the system will check to confirm that the script in the database is the same as that saved to the Site folder for the site. If it is not the same, a warning is presented allowing one to load the content from the Site folder and update the database if desired. purposes. Above the script editor box, there are tools to upload a site script into the editor, or download the current script to your local device.
Note:
Changes made in the Site Scripts editor will be saved only after you click the Save Code button at the bottom of the editor screen. |
Where are Google Analytics and reCAPTCHA Settings?
The configurations for Google Analytics and Google reCAPTCHA have been moved within the Site Manager from the Site Configuration screen's Site Scripts tab where they were found in previous versions, and added to the new Site Configuration > Integrations tab which is documented below.
Use the Integrations tab to enable, configure and setup third-party integrations loaded into the site page engine.
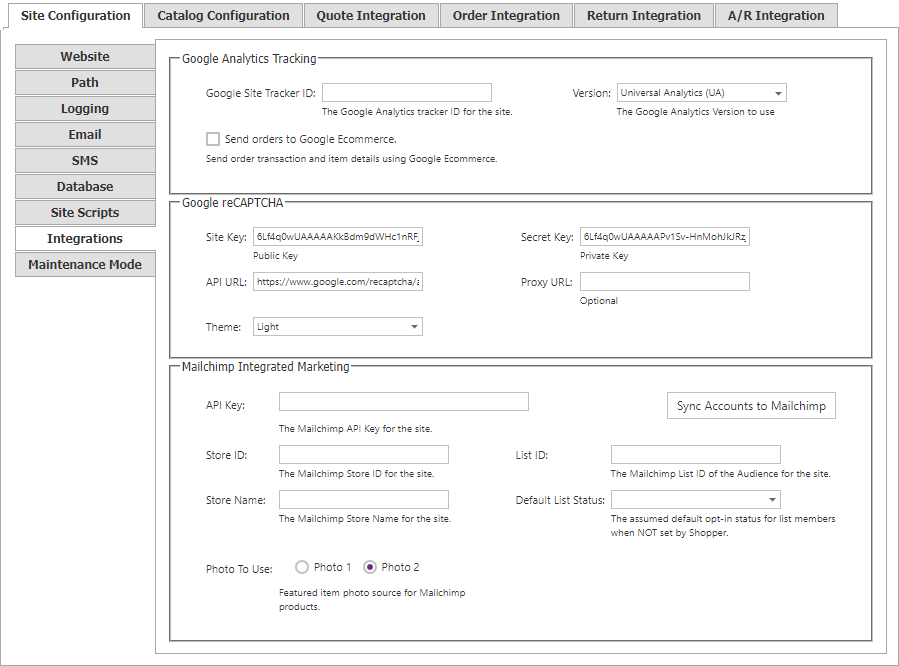
The Integrations tab contains the following sections:
| Integrations | |
|---|---|
| Google Analytics Tracking |
Settings to configure Goolgle Analytics for the site
|
| reCAPTCHA Configuration |
Settings to configure reCAPTCHA for use on the site. If using the feature, the fields marked as Required must have values for the feature to function.
|
| Mailchimp Integrated Marketing |
Settings to enable and configure Intuit's Mailchimp integration.
|
Important Note:
Changes made in the Site Manager take effect immediately and are saved as soon as you leave a field, check a box, or make a drop-down selection.
The change confirmation mark appears next to the field you are editing and disappears upon saving.
Use the Maintenance Mode tab to choose the Maintenance HTML Page location and Whitelist specific IP Addresses.
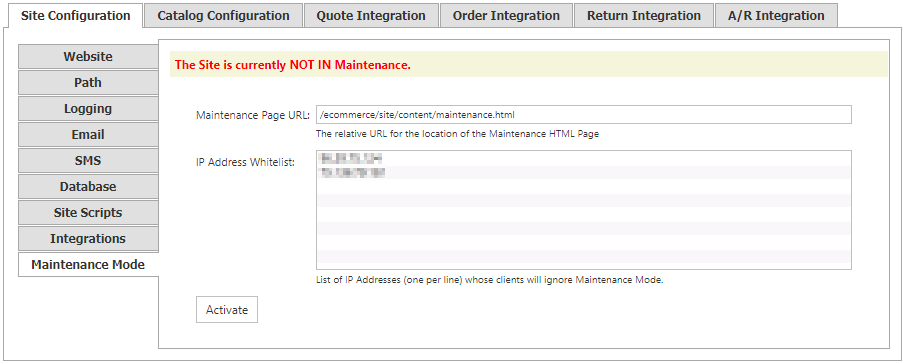
The Maintenance Modetab contains the following sections:
| Maintenance Mode Information | |
|---|---|
| Maintenance Page URL |
A form for inputting the relative URL for the location of the Maintenance HTML Page. |
| IP Address Whitelist | Section in which you can create a list of IP Adresses whose clients will ignore Maintenance Mode. |