

The second tab in the "Site Manager" is the Catalog Configuration tab.
This tab allows you to set Catalog display preferences and defaults. You can access the various options through the sub tabs on the left side of the screen. These include:
General Account Settings Distributor Settings Item Defaults Price Settings Quantity Settings Shopping Cart Hot Spots Templates
Use the General tab to maintain general catalog setup information and to configure options.
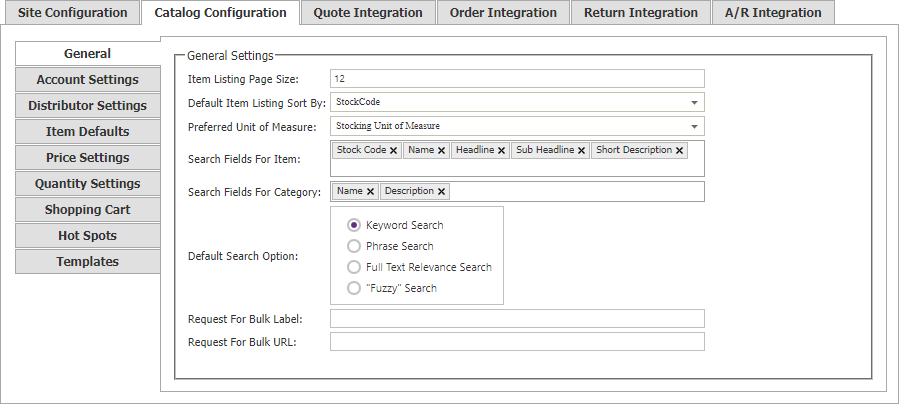
The General tab contains the following elements:
| General Information | |||||||||||
|---|---|---|---|---|---|---|---|---|---|---|---|
| Item Listing Page Size | The number of items to display in listings before requiring the user to page or scroll to see more. | ||||||||||
| Default Item Listing Sort By |
The order in which Items will be displayed in Item listings.
The available "Default Item Listing Sort By" options are:
None
Single Dimensional Options
Multi-Dimensional Options
|
||||||||||
| Preferred Unit of Measure |
The unit of measure, which if defined for an Item is the default unit of measure to used within the Catalog. The "Preferred Unit of Measure" options include:
Important: For more information about unit of measure business logic, and how Preferred Unit of Measure is determined, please see the Preferred Unit of Measure topic. |
||||||||||
| Search Fields For Item |
A list of CyberStore Item database columns in which the catalog search will look to in order to match a shopper's search criteria. Clicking in the field area lists available fields in the database. Available Item fields are:
|
||||||||||
| Search Fields for Category |
A list of CyberStore Category database columns in which the catalog search will look to in order to match a shopper's search criteria. Clicking in the fiedl area lists available fields in the database. Available Category fields are:
|
||||||||||
| Default Search Option |
The default search algorithm for Item searches. The following choices are available:
Searches are case insensitive by design. |
||||||||||
| Request For Bulk Label | The label used for the Request for Bulk link. | ||||||||||
| Request For Bulk URL | The URL for the Request for Bulk link. |
Use the Account Settingstab to modify account settings of your users. .
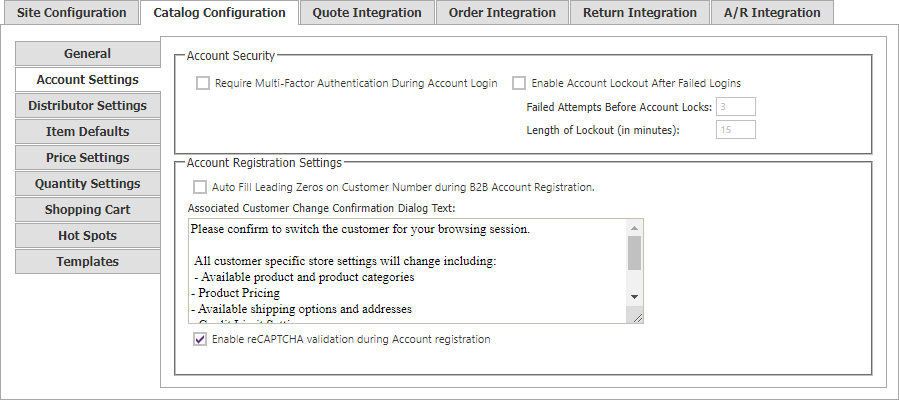
The Account Settingstab contains the following sections:
| Account Settings Information | |
|---|---|
| Account Security |
This section contains settings that affect login security for front end shoppers.
|
| Auto Fill Leading Zeros on Customer Number during B2B Account Registration | Select this option to automatically allow the CyberStore application to add leading zeros to a user's Customer Number input during registration. |
| Associated Customer Change Confirmation Dialog Text | Text entered here will display in the message pop up when a logged-in Shopper changes their associated Customer using the CustomerMasterAccountControl. |
| Account Security | Allows the application of Account Lockout. By default 3 faied login attempts will result in a 15 minute lockout, however both of these numbers can be changed in their respective text box. |
Where are Customer Character and Format Settings?
Previously, the number of character limit for Customer Number and its format had settings on this tab. They have since been moved to the A/R Integration section in the General tab.
Use the Distributor Settingstab to [description].

The Distributor Settings tab contains the following elements:
| Distributor Settings Information | |
|---|---|
| Distributor On Hand Message when Available (Quantity > 0) | Message to display when a Distributor's On Hand quantity is greater than zero. |
| Distributor On Hand Message when Unavailable (Quantity <= 0) | Message to display when a Distributor's On Hand quantity is equal to or less than zero. |
| Max Miles for Distributor Search Results | The maximum number of miles to include in a distributor search. |
| Max Miles for Distributor Listing Results | The maximum number of miles to display in a distributor result listing. |
Use the Item Defaultstab to define your Default SKU Selection Mode and set up Item Accessory Options.
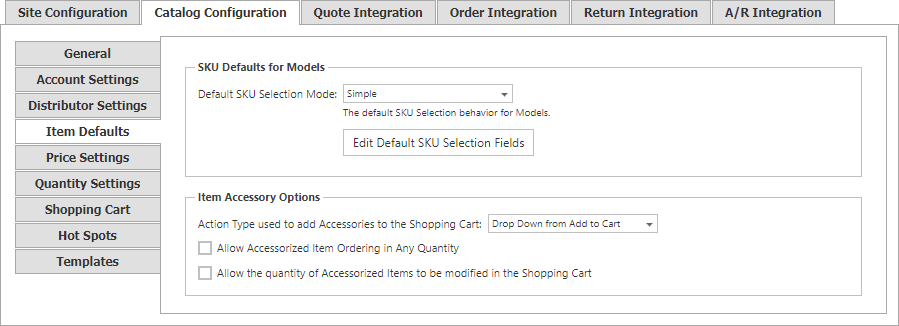
The Item Defaults tab contains the following elements:
| Item Defaults Information | |||||||||||||
|---|---|---|---|---|---|---|---|---|---|---|---|---|---|
| Default SKU Selection Mode |
The default setting for SKU selection when using the CatalogPricingControl. Options available are:
This setting can be overridden using the SKUSelectionMode property. |
||||||||||||
| Edit Default SKU Selection Fields |
A button that, when clicked, allows you to arrange the SKU Characteristics.
|
||||||||||||
| Action Type used to add Accessories to the Shopping Cart |
Choose which way shoppers will add accessorized Items to the Shopping Cart. The options are:
|
||||||||||||
| Allow Accessorized Item Ordering in Any Quantity | Allows the shopper to add Accessorized Items and individual accessories to the cart in any quantity desired (so long as it is not less than a configured minimum). When disabled, Accessorized items and accessories will always have a single quantity when adding to the cart and cannot be changed by the shopper. | ||||||||||||
| Allow the quantity of Accessorized Items to be modified in the Shopping Cart | Allows the shopper to adjust the quantities of Accessorized Item and individual accessories when in the cart. When disabled the quantity box for the main item is disabled and invisible in the accessory grid. |
Use the Price Settingstab to [description].
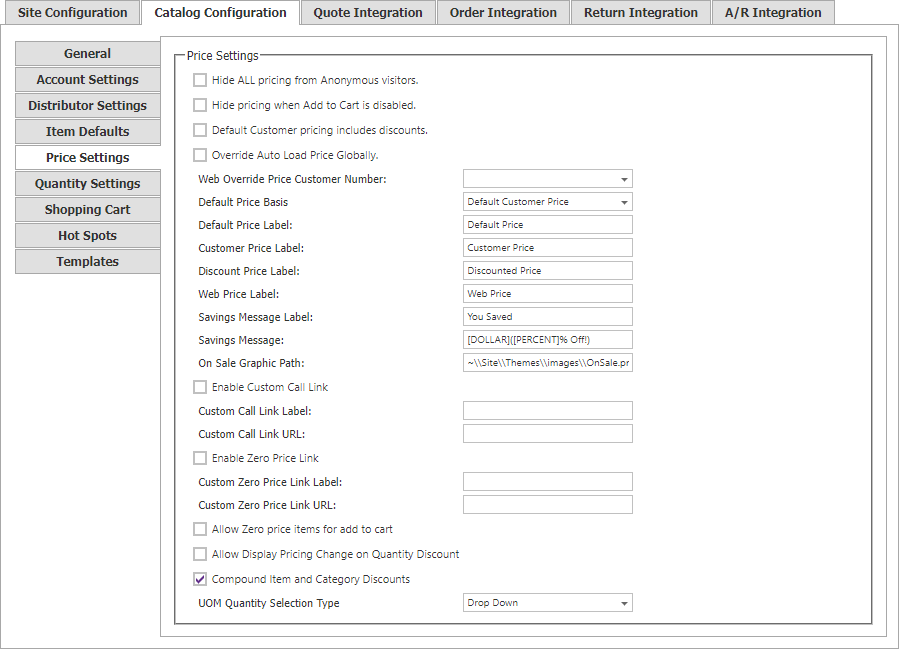
The Price Settings tab contains the following elements:
| Price Settings Information | |
|---|---|
| Hide ALL pricing from Anonymous visitors. | Prevents Site visitors from seeing the Item prices unless they are logged into an Account. |
| Hide pricing when Add to Cart is disabled. | Prevents Site visitors from seeing the Item prices when they do not have access to the Cart. |
| Default Customer pricing includes discounts. | If you the pricing of your Default Customer is based on an external discount in SYSPRO, check this option. |
| Override Auto Load Price Globally. | When the CyberStore pricing should universally override any specific Customer's pricing, use this option. |
| Web Override Price Customer Number | The price code to use when overriding Customer Pricing Globally. |
| Enable Custom Call Link | Enables a custom call pricing message and option al URL link when pricing is unavailable from SYSPRO. |
| Custom Call Link Label | The "Call" text message. |
| Custom Call Link URL | The optional "Call" URL that can be used as a link in the Call message. |
| Enable Zero Price Link | Enables a custom pricing message when the price returned from SYSPRO is 0.00. |
| Custom Zero Price Link Label | The zero price text message. |
| Custom Zero Price Link URL | the optional zero price URL that can be used as a link on the zero price message. |
| Allow Zero price items for add to Cart | Enables the ability to add lines to the Shopping Cart that have a price of 0.00. |
| Allow Display Pricing Change on Quantity Discount | Enables the ability to auto-recalculate the price display as the quantity input is changed when quantity pricing is available. |
| Compound Item and Category Discounts | When checked, Item and Category CyberStore discounts are combined, first applying the Category discount then the Item discount. When unchecked, the highest discount of the Item and Category discount is taken. |
| UOM Quantity Selection Type | The UI option for grouping or price dropdown for multiple units of measure in the CatalogPricingControl. |
Use the Quantity Settingstab to configure site settings that affect inventory quantity.
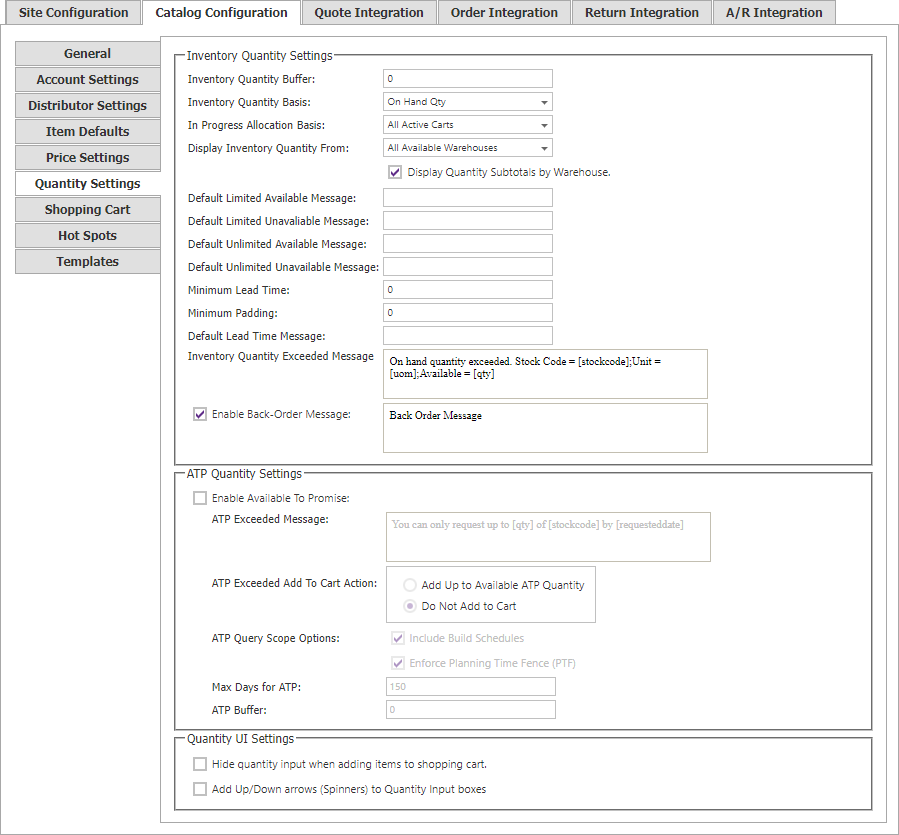
The Quantity Settingstab contains the following settings:
| Quantity Settings | |
|---|---|
| Inventory Quantity Buffer | Adjust inventory quantity numbers by this value to decrease the quantity displayed by the entered amount. Using this feature reduces globally the amount of stock on hand for all items before showing to the shopper. |
| Inventory Quantity Basis |
Set which inventory availability column to use as the basis for inventory quantity display and logic. Options are those available in SYSPRO:
|
| Display Inventory Quantity From |
Determine whether inventory quantity is inclusive of all available warehouses or limited to specific Customer and Item warehouses. Available options are:
In addition, if desired, inventory quantity displays can be further enhanced by checking the "Display Quantity Subtotals by Warehouse" option. Doing so will display a table of inventory quantities by warehouse for all warehouses that the item belongs and is avialalbe for CyberStore to access via web operator settings in SYSPRO. Important Note: It is not recommended that sites display inventory quantity sybtotals by warehouse when utilizing the CyberStore inventory buffer feature. Current business logic will display quanties by each warehouse, with each quantity being reduced by the buffer amount.
|
| In Progress Allocation Basis |
Set the scope of items in other site visitors to use when calculating in progress allocations. The setting has two options:
Abandoned Cart Exception By rule, all Abandoned Cart quantities are ignored when calculating in progress allocation. |
|
Default Limited Available Message |
A message that appears by default when there is a limited quantity of the Item in stock. |
| Default Limited Unavailable Message | A message that appears by default when there is a limit to the quantity of an unavailable Item. |
| Default Unlimited Available Message | A message that appears by default when there is no limit to the quantity of the Item that the Customer can purchase. |
| Default Unlimited Unavailable Message | A message that appears by default when there is no limit to the quantity of an unavailable Item. |
| Minimum Lead Time | The minimum number of days to show when displaying lead time. |
| Minimum Padding | The minimum padding of days to transform the lead time into a range. |
| Default Lead Time Message |
The lead time message.
|
| On Hand Quantity Exceeded Message |
A message that appears when the Customer tries to purchase a greater quantity of the Item than there is available.
|
| Enable Back-Order Message | A box that, when checked, causes a message to appear to inform the Customer that an Item is on back-order. You can enter the custom message you would like to appear in the adjacent field. |
| Enable Available to Promise |
A checkbox, that when checked forces Available to Promise (ATP) calculations will be used in addition to simple inventory lookup when validating if an item is available. Additionally, when ATP is enabled, shoppers must enter a requested ship date, or requested ship date range from the CustomerChangeRequestShipDateControl, and if a quantity entered is not available to ship on the reqeusted date, then the item cannot be added to the cart in that quantity.
2ad54db2-2783-4891-a20d-15e9049dcc59
|
| Hide quantity input when adding items to Shopping Cart | A checkbox that when checked will hide the quanity input when adding items to Shopping Cart. |
|
Add Up/Down arrows (Spinners) to Quantity input boxes
|
A checkbox that when checked will add Up and Down arrows to the quantity input boxes. |
Use the Shopping Carttab to [description].
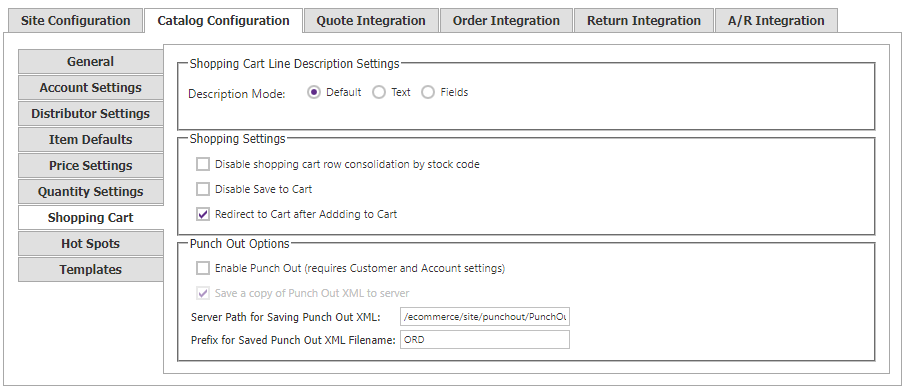
The Shopping Cart tab contains the following elements:
| Shopping Cart Information | |
|---|---|
| Shopping Cart Line Description Settings |
This section allows one to alter the description that will be used when an item is added to the shopping cart. Default - By default, the name of an Item will be used as the line descritpion. Text - This option allows one to select from either the Item name, or the Item's SYSPRO Long Description (LongDescription2), or a version using both with a designated field separator. Fields - Finally, the Fields option lets one pick Item Name, SYSPRO Long Description and UserField1 as viable options, any combination of them can be used in any order and again will allow for using a separator string value which is inserted between the field values (be sure to include spaces if desired).
Implementation Note: This setting will alter the front end presentation of the line item only. It will use the setting in the cart, and all the way through the confirmation screen keeping the same description present to the shopper. Howver, the setting does not change the line item description on the submitted sales order. The default will always be the Item's name (SYSPRO Description) when the order is submitted. To alter this default behavior, you must enable the UseStockDescSupplied setting in the Settings tab or Site Manager > Order Integration |
| Disable Shopping Cart row consolidation by stock code | A checkbox that when checked will disable shopping cart row consolidation by stock code. |
| Disable Save to Cart | A checkbox that when checked will disable the ability to save a cart. |
| Redirect to Cart after Adding to Cart | A checkbox that when checked will automatically redirect a shopper to the cart after adding an Item to the cart. |
| Enable Punch Out (requires Customer and Account settings) | A checkbox that when checked will enable Punch Out. For more information on Enabling Punch Out for your CyberStore check Work Flows > Punch Out > Enabling Punch Out. |
| Save a copy of Punch Out XML to server | A checkbox that when checked will save a copy of Punch Out XML to server |
| Server Path for Saving Punch Out XML | A textbox for the path where punch out cXML files can be logged to on the server. |
| Prefix for Saved Punch Out XML Filename | A textbox where one can set a series of characters that will pre-pend any punch out XML filename. |
Use the Hot Spotstab to [description].
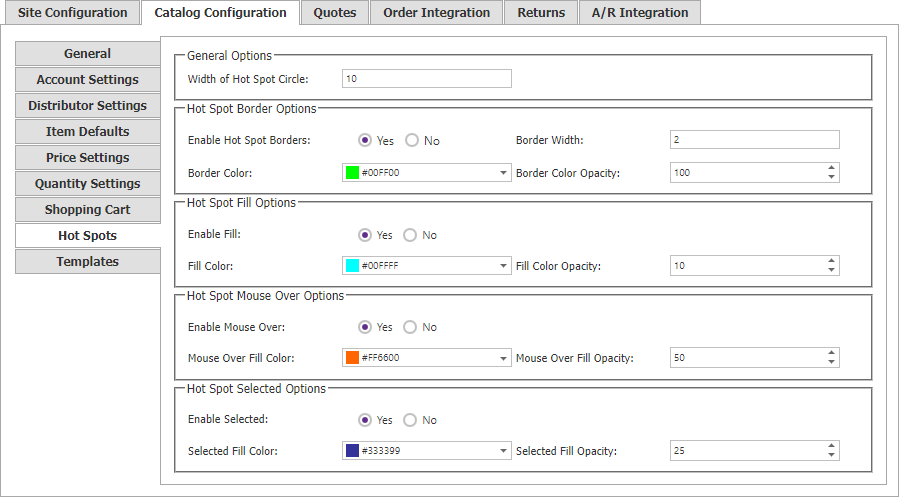
The Hot Spots tab contains the following sections:
| Settings Information | |
|---|---|
| General Options | Width of Hot Spot Circle: The diameter of a Hot Spot in pixels. |
| Hot Spot Border Options |
Override Default: Check this to allow the setting to override the Site configured default. Enable Hot Spot Borders: Yes to enable, No to disable. Border Width: The border width in pixels. Border Color: The hexadecimal color for the border. Border Color Opacity: The border's opacity - 100 = fully opaque, 0 = transparent |
| Hot Spot Fill Options |
Override Default: Check this to allow the setting to override the Site configured default. Enable Fill: Yes to enable, No to disable. Fill Color: The hexadecimal color for the fill. Fill Color Opacity: The fill opacity - 100 = fully opaque, 0 = transparent |
| Hot Spot Mouse Over Options |
Override Default: Check this to allow the setting to override the Site configured default. Enable Mouse Over: Yes to enable, No to disable. Mouse Over Fill Color: The hexadecimal color for the fill. Mouse Over Fill Opacity: The fill opacity - 100 = fully opaque, 0 = transparent |
| Hot Spot Selected Options |
Override Default: Check this to allow the setting to override the Site configured default. Enable Selected: Yes to enable, No to disable. Selected Fill Color: The hexadecimal color for the fill. Selected Fill Opacity: The fill opacity - 100 = fully opaque, 0 = transparent |
Use the Templatestab to [description].
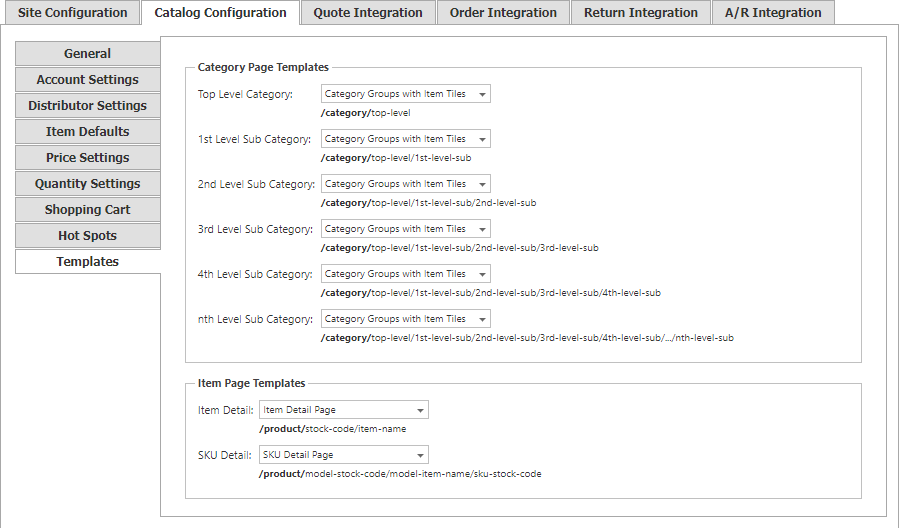
The Templates tab contains the following sections:
| Templates Information | |
|---|---|
| Category Page Templates | Drop down boxes that enable you to select which page templates apply to the top level category through the nth level sub category. |
| Item Page Templates |
SKU Detail: |